Many years ago, the developers had to put enormous efforts in developing their own Backend services for the applications. This was an additional time span added to the development cycle when the front end required more attention. Then Firebase came into the game.
Firebase offers many services to its users for free (Obviously having some limits on it). But in this tutorial, I’ll teach you about Firebase Authentication only. I’m not going to cover all the services within a single blog.
I’ll discuss how to integrate Firebase Authentication with your React Native / Expo project. By the end of this tutorial, you’ll have a strong understanding of Firebase Authentication with Email/Password.
Table of Contents
- Setup my Firebase
- Installing Firebase Dependencies
- Authentication Provider Settings
- Creating a User with Firebase
- Signing in the User with Firebase
Setup my Firebase
- The first step in this tutorial is setting up the Firebase project. Visit the Firebase Console from the link given:
https://console.firebase.google.com/
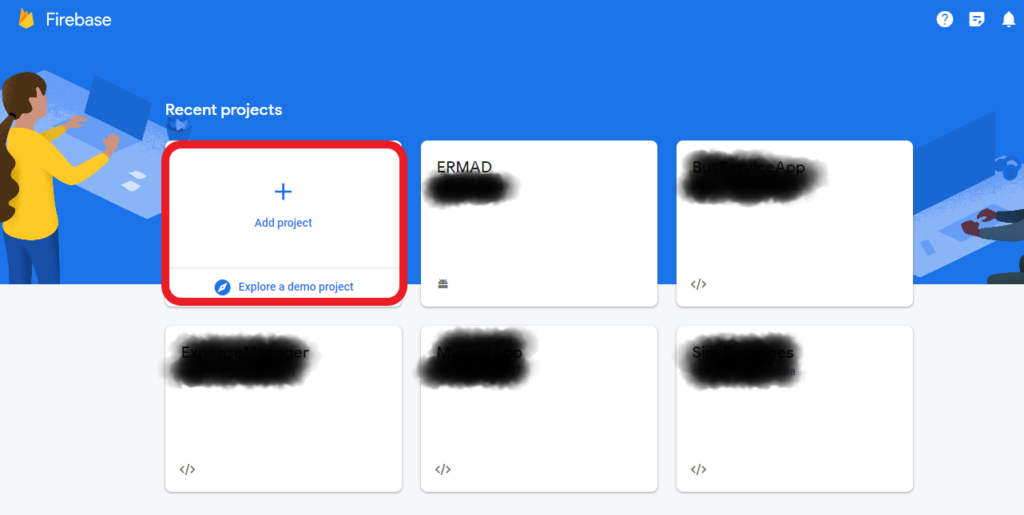
- You’ll see a similar web page on the link. Select Add Project to start your new project.

- When you click on the Add Project button, you’ll see 3 steps ahead to continue creating a project on Firebase Console. In step 1, you’ll need to give the name of your project, accept the Firebase Terms and click on Continue.

- In step 2, allow the Firebase Analytics if have requirements for it (For this project, I’m turning this feature off). Then click Create Project and on the next step, the project will be created.

- After this, move to the setting icon and select General Page from the top menu tabs.

- Scroll down a little and you’ll find the Configuration Keys just under the SDK setup and configuration menu. Copy the configuration keys, then move to your React Native/Expo project, and paste them into a new index.js file. (I’ll suggest you keep the folder structure like this)

- Your Firebase Configuration files will be like:
// BusServiceApp Firebae Configuration
// Import the functions you need from the SDKs you need
import { initializeApp } from "firebase/app";
// TODO: Add SDKs for Firebase products that you want to use
// https://firebase.google.com/docs/web/setup#available-libraries

// Your web app's Firebase configuration
const firebaseConfig = {
  apiKey: "YOUR KEYS GOES HERE",
  authDomain: "YOUR KEYS GOES HERE",
  projectId: "busserviceapp-209dc",
  storageBucket: "YOUR KEYS GOES HERE",
  messagingSenderId: "YOUR KEYS GOES HERE",
  appId: "YOUR KEYS GOES HERE"
};

// Initialize Firebase
const app = initializeApp(firebaseConfig);

export default app; //Export app to access in other files.- The Firebase configuration keys are already initialized in a const app variable. You just have to export that app so that you can access it in other files. Do this in the index.js file where you have pasted your configuration keys.
Installing the Firebase Dependencies
- To use Firebase in your React Native app, you need to install the necessary dependencies. Open your project directory in the terminal and run the following command:
npm install firebase
npm install firebase/auth
Authentication Provider Settings
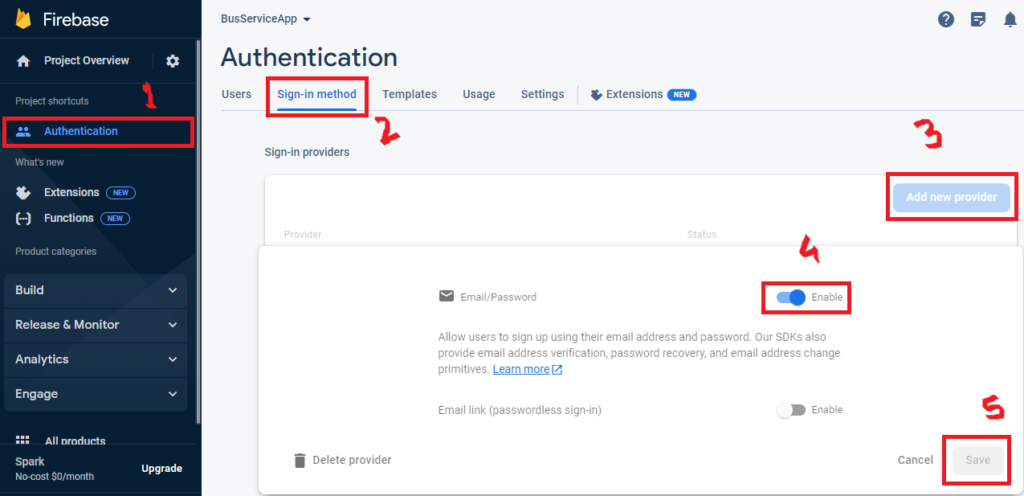
- After the installation, again go back to your Firebase Console. From the left sidebar, select Authentication, then select the sign-in method from the Authentication pages, then click on Add new provider.
- You will see many authentication providers, just select the Email/Password option (We’ll only go with this option in this post). Enable this option and Click Save.

Now our provider settings have been completed.
Creating a User with Firebase
- Import the app in your Signup.js file. (Remember we just exported it from the Firebase/index.js file ?)
- Then import getAuth, createUserWithEmailAndPassword from firebase auth.
- Make a const variable auth and assign getAuth() to it. Pass the app as a parameter to the getAuth() method.
- Then define a function where the createUserWithEmailAndPassword method will be used and you’ve to pass the auth, email, and password to this method.
- For simplicity, I’m only focussing on the Firebase method. The other React Native stuff is not discussed like importing components from react-native, making button and text input, etc.
import app from '../Firebase';
import { getAuth, createUserWithEmailAndPassword } from "firebase/auth";

    const auth = getAuth(app);
    const [email, setEmail] = useState('');
    const [password, setPassword] = useState('');


    function signup() {
        try {
            createUserWithEmailAndPassword(auth, email, password)
                .then((userCredential) => {
                    // Signed in
                    const user = userCredential.user;
                    // ...
                    console.log("User created")
                })
                .catch((error) => {
                    const errorCode = error.code;
                    const errorMessage = error.message;
                    console.log(errorCode);
                });
        } catch {
            alert('Email or Password is incorrect. Please retry!');
        }
    }
Now make this function call by using the onPress prop in your component. The Firebase will automatically create a user with the provided email and password. You can see the user on the Firebase Users page.
Signing in the User with Firebase
What you have to do in your Login.js file is:
- Again import getAuth, signInWithEmailAndPassword from firebase/auth.
- getAuth() method is also required in this file.
//Login.js file
import { getAuth, signInWithEmailAndPassword } from "firebase/auth";
import app from '../Firebase';

    const auth = getAuth(app);
    const [email, setEmail] = useState('');
    const [password, setPassword] = useState('');

    const onLoginPress = () => {
        try {
            signInWithEmailAndPassword(auth, email, password)
                .then((userCredential) => {
                    // Signed in
                    const user = userCredential.user;
                    // ...
                })
                .catch((error) => {
                    const errorCode = error.code;
                    const errorMessage = error.message;
                });
        } catch (error) {
            alert("Wrong email/password")
        }

    }
If you still find something confusing as a beginner, just mention your issue in the comment section. I’ll come back to you ASAP.
Follow our Social Channels for the latest updates
Happy coding!


This is nice, however lots of other people including me are looking for a away to use Google login as well…thank you, please,it would be helpful if you do a tutorial on this
As someone still navigating this field, I find your posts really helpful. My site is Webemail24 and I’d be happy to have some experts about Branding like you check it and provide some feedback.